One holiday makeup look isn't enough to get you through the celebrations so here's a look inspired by Rock and Roll. When I think of Rock and Roll fashion words like black, heavy, loud and glamourous comes into mind and aptly so, my Rock and Roll inspired makeup has plenty of black and plenty of gold shimmer eyeshadow.
I've switched things up a bit in this tutorial to introduce some other techniques I use to create my eyeshadow looks that wasn't covered my previous tutorials.
First, I'm going to apologize for the photo quality and sizes. These are
smaller than the standard I've set for the tutorials. I did not realize
when taking the photos that my camera settings were set to lowest
resolution. The photos sizes are enough to reference to but anything you're uncertain of, drop me a note in the comments below.
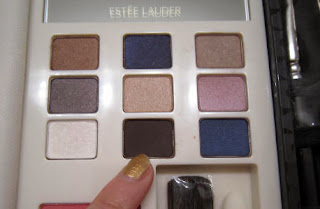
These are the eyeshadows I used to create the look. As always, they can be substituted with similar colors you may already have. As long as the product has decent pigmentation and will stay on your lids for hours, you're good to go.
- Estee Lauder Eyeshadows in Lavish Mink, Hot Cinnamon, and Sugar Cube
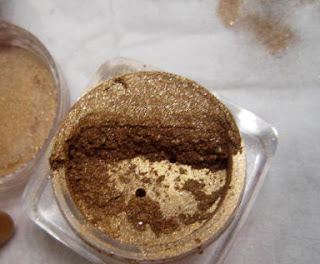
- Lise Watier Mineral Couleur Folle Mineral Loose Powder Eyeshadow in D'or
Refer to this diagram when you're unsure of which part of the eyelid I'm talking about.
1. I applied Too Faced Shadow Insurance primer and used Shu Umeura's Glow On Blush P Peach 42 as a base all over lids. Any light base that helps make the colors go on smoother and pop will work.
This is not shown in the photo but because I will be working with and layering on black eyeshadow, I took the extra step to apply excess loose makeup setting powder under my eyes, particularly the area above and on my cheekbones. I did this so that fallen eyeshadow bits can be easily swept off along with the excess loose powder once I'm done.
2. Next, I applied Estee Lauder's Lavish Mink starting with my upper lashline to middle of the entire lid with a medium-sized flat brush. As you get to the end of your eyelid, define a slanted line down your outer v. We will use this line as an outline for when we start layering black eyeshadow over it. If you make a mistake shaping the line now it's much easier to correct than later when you have matte black eyeshadow.
Tip: Always outline and shape your look with eyeshadow colors that's visible but easy to correct. For example, a light brown if you have light to medium skin tone or an ivory white/biege for darker skin tones.
Next, I used Hot Cinnamon as my transition and blending color which I applied on the center of my lid from upper lashline all the way to the middle of the lid using the same flat eyeshadow brush as above.
3. The next step is probably the most important part to making this look a success. I took several photos to help you understand this.
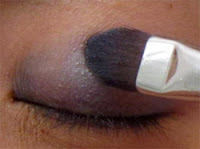
Using my trusty small soft dome-shaped brush, I dabbed some MAC Carbon black matte eyeshadow.
Caution: Black and other similarly dark eyeshadows can be a HUGE pain in the butt to deal with when excess product drops to your lower lid. Promise me you will always dab your brush on a tissue or better yet, tap it against the edge of a solid surface (sink, counter, chair) before you put that brush anywhere near your face.
4. I start from midway on my upper lashline and move to my outer v, following the slanted line I created with my brown matte eyeshadow in Step 2., I continue up to my crease lightly going over it a few times to deposit product.
The key is to apply the color in layers until you have a second outline created with Carbon. You want to layer your black eyeshadow on because again, it's easier to correct if you make a mistake and when you apply your eyeshadow in layers, you have more control on the depth of your look.
The shape I'm creating is starting to be more visible so I add more Carbon to it.
I used my MAC 217, fluffy crease brush to blend out the black eyeshadow ontop my crease. Once I'm happy with how blended out the color is, I apply my third layer of Carbon using a smudge brush (photo furthest right). At this point, I am confident with the base shape I've created so now I'm going to go bold (as needed with this look) and pack on more black eyeshadow to achieve that smoky eye. Remember, even if you're going bold and using a smudge brush, you still want to apply eyeshadow in layers.
Continue to layer color and blend upwards and inwards on your eyelid until the area is evenly opaque.
And now we're at the funnest part. Coulour Folle! or as I'd like to call it, super fine glitters! :) Lise Watier has a nice line of mineral loose powder eyeshadows that come in beautiful colors like bright pink, ocean blue, violet, gold just to name a few. The one I'm using here is called D'or (gold in French).
Very little of this goes a long way and I mean a very long way. One pot will last a year if you use it everyday and apply enough on both lids for opaque coverage. The loose eyeshadow goes on very smoothly and unlike glitter, does not require a sticky base to adhere to. It can be messy to work as with any loose powders so handle with care.
I dab my trusty flat eyeshadow brush into D'or and got rid of the excess on a tissue. Do not tap your brush against a hard edge before you had a chance to dab your brush on the tissue. You will be using the excess to apply more layers.
Start with the inner corner of your eye and move across until you reach the black eyeshadow area. Even out the product and dab the excess on your tissue and repeat. When the gold is opaque enough, lightly blend the product on your lid further into the outer lid so the gold and black eyeshadows overlap.
This is how your eyeshadow should look once all the blending is done.
[left to right]: I applied some liquid eyeliner and then lined my waterline to about 3/4th of the way starting on the outer corner of my eye with a Lancome's kohl eyeliner in black. I then went over (photo on the right) the eyeliner with the same MAC Carbon eyeshadow to increase the longevity of my kohl liner.
Tip: Your liner goes from lasting a short amount of time to several hours when you put a powder eyeshadow over a pencil liner.
I filled in the tiny spot on the other corners of my eye that didn't have any eyeshadow or liner on it to "connect" the black eyeliner on my waterline to the eyeshadows on my eyelids.
Finally, put on your favorite part of false lashes and you're done! I used Shu Umeura's False Lashes Smoky Layers.
The look is complete! Be sure to fill in any visible lash adhesive with a black gel or liquid liner.
I look very sleepy in this photo because I was. This one was taken after the party which I would have not used and they turned out slightly bigger than the ones I took before so sleepy weepy it is. The plus side is you can see the eyeliner on my waterline is still intact after 5 hours. Compare to photos directly above and you'll see it's a little bit faded but no smudging and only slightly dropping to the lower lids.
Rock and Roll was loads of fun to create. Hopefully, you got some useful tips to use for your next party from here.
For more makeup looks + tutorials, check
here!
Here's a list of makeup I used for the look:
1. Too Faced primed & Poreless Skin Smoothing Face Primer - review here
2. Too Faced Shadow Insurance Anti-Crease Eye Shadow Primer -
review here
3.Covermark Essence Foundation in BN20 mixed with;
4.Mary Kay Medium-Coverage Foundation
5. Graftobian Hi-Def Glamour Creme in soft orange
7. Shu Uemura Glow On Blush in M Pink 30
8. Estee Lauder Eyeshadows in Lavish Mink, Hot Cinnamon, and Sugar Cube
9. Lise Watier Mineral Couleur Folle Mineral Loose Powder Eyeshadow in D'or
10. Heroine Make Kiss Me Smooth liquid Eyeliner
11. Shu Uemura Smoky Layers False Lashes with
Shu Umeura Lash Adhesive - review here 


